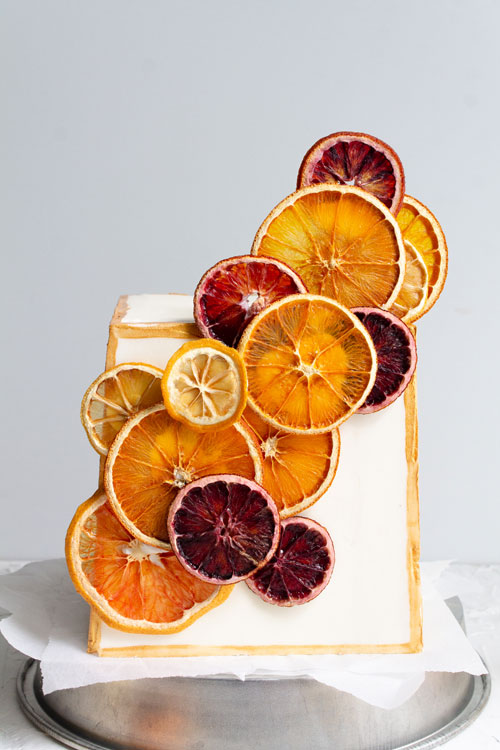
This citrus cake design is a beautiful illusion. It seems complex but in reality is very easy to put together. It’s sure to impress your friends and family at the next gathering!
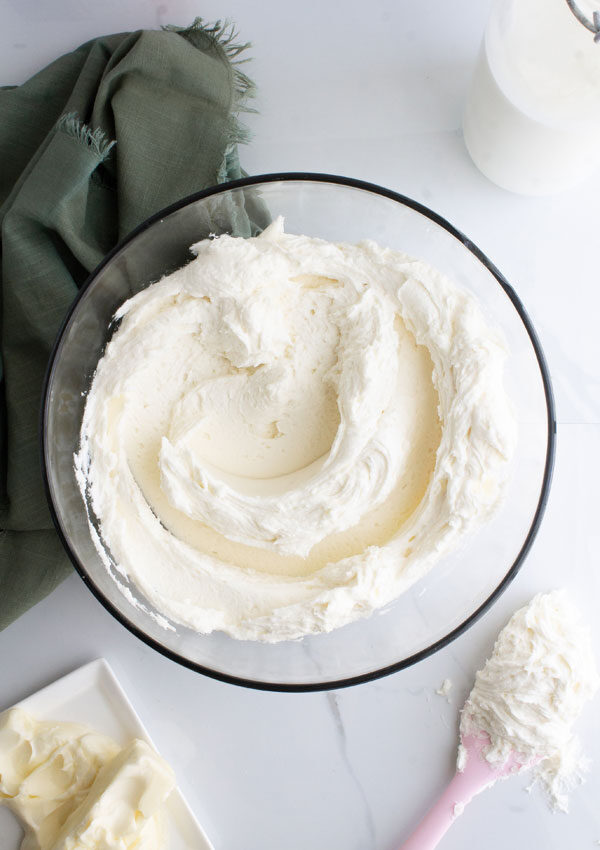
To make this Citrus Cake Design you will need to start with a good cake and frosting recipe. I’m using my Chocolate Cake and a double batch of my American Buttercream Frosting recipe, though the design could work with any cake flavor! It’s important to use a buttercream that will crust in order to paint the gold trim.
What is a “crusting buttercream?”
A crusting buttercream, though it sounds unappealing, is a buttercream that forms a hard outer layer once it makes long enough contact with the air. The hard outer layer that forms makes it easy for cake designers to add painted designs like our gold luster dust for example. American Buttercream is a crusting buttercream and therefore will be the best choice for this design.
My last post goes in depth about American Buttercream so be sure to check it out so that you can make fail-proof buttercream every time you make it!
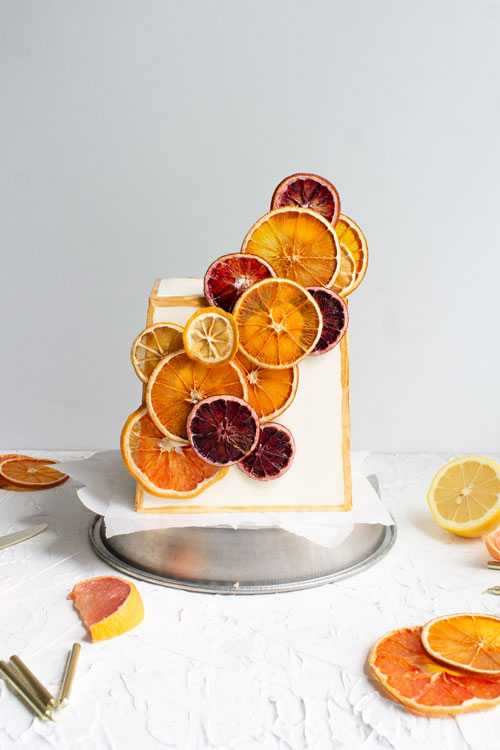
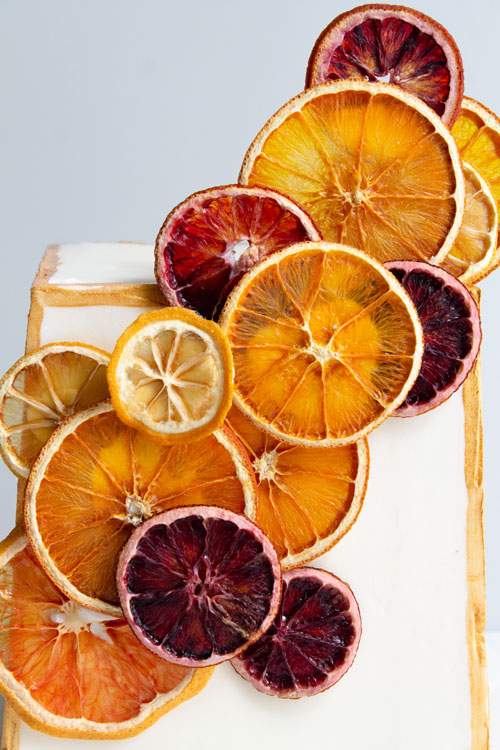
This cake is not only unique because of its shape, it also has classy and earthy elements in the gold trim and dried citrus. Somehow all of the aspects of the cake design come together to make a work of art that will be difficult to want to cut into!
For this Cake Design you will need:
Cake– make it from scratch or use a boxed mix. No judgment here!
Frosting– use American Buttercream and have fun with it, color the buttercream if you’d like! I cover how to color buttercream in my American Buttercream YouTube Video here!
Gold Luster Dust– I’ve tested out many luster dusts and can confidently say: they are NOT all made equal. Some brands I like are Oasis, CK and the one I use the most, Sunflower Sugar Art. I use the African Gold Edible Luster Dust which can be found here. Whichever brand you choose just make sure you buy the edible kind!
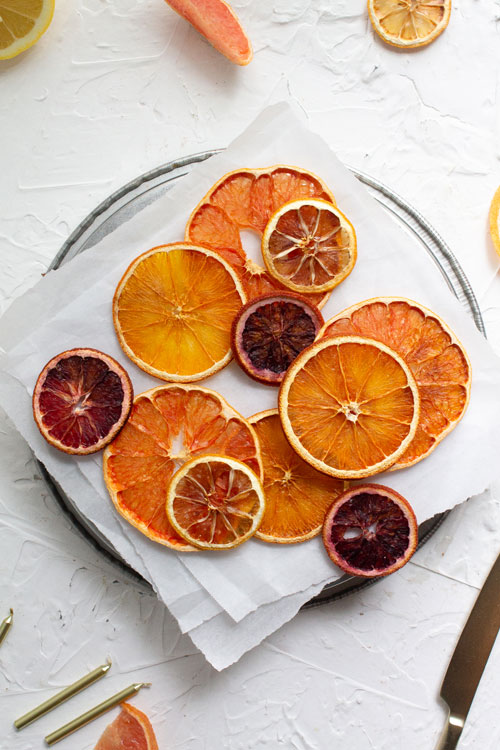
Citrus Fruits– I used lemons, oranges, blood oranges and grapefruits to incorporate a variety of colors and shapes.
High Proof Alcohol*– This is for your luster dust! To turn it into a paintable consistency it must be used with a high proof alcohol (anything over 100 proof is fine). This is because high proof alcohol evaporates quickly causing less liquid to sink into the frosting. I bought a $6 vodka that I’ve been using for cake decorating for over a year!
*Fresh lemon juice can be used instead of alcohol if you are too young or uncomfortable with going to the liquor store. It doesn’t work quite as well but it will get the job done!
Paintbrush– you will use a thin paintbrush to paint the gold trim onto the cake.
Dowels (optional)– dowels can be used to help stabilize the cake since you will be stacking it high. Just stick some bubble tea straws or wooden dowels in your cake so the layers don’t move around as much.
Plastic Wrap (optional)– another way to help the cake stand up straight is by using plastic wrap. Stack your cake and then wrap it in plastic wrap, shaping it with your hands. Put it into the fridge for a minimum of 1 hour. After its time in the fridge it will be stable to work with because the buttercream will have hardened in the shape you want! Watch me do this in my YouTube Tutorial video here!
Offset Spatula*– for smoothing buttercream onto the top and sides of the cake.
Bench Scraper*– for getting clean sides and sharp edges.
Cake Board*– flat stable surface on which to decorate your cake.
*There are various alternatives when it comes to cake decorating supplies. Don’t let the fact that you don’t have something on the list above be the reason you don’t try your hand at this design. Check out my How to Frost a Cake: Step by Step post to learn about some alternatives to common cake decorating supplies.
How to Dry the Citrus
To make this Citrus Cake Design you will first need to dry the citrus. I HIGHLY recommend doing this ahead of time. Drying citrus is extremely easy but it can take anywhere from 2-5 hours depending on the equipment you have to use. Though it is easy to do, you’ll definitely want to split the work over a few days.
Fortunately dried citrus can keep for years if dried properly. Make the dried citrus even a week before you design your cake if you’d like. Confession: that’s exactly what I did.
Set your oven to 190-200oF. If your oven runs hot be sure to set it to the lower temperature.
Cut various citrus fruits into slices about 1/4 inch or less thick. The thinner your slices are the faster they will dry out.
Gently use a paper towel to blot any moisture. This step will also speed up the drying process.
Place your citrus slices on a baking sheet lined with parchment paper and bake them for 2-5 hours checking in on them every 30-45 minutes to flip them and assess if they are done.
The smaller fruits will dry out first. My lemons and blood oranges dried after 2.5 hours while my grapefruit and oranges took a full 5. Store your dried citrus in a container or bag in a cool dark place.
How to Make the Cake
For this design you can bake your cake in rectangular or square pans. For this tutorial I used two sheet pans to bake up my cakes*. The reason I did this is because I wanted lots of thin layers of cake to be able to stack the cake nice and high with even layers of frosting and cake throughout the whole dessert.
*Keep in mind that the more spread out your cake batter is, the less time it will need in the oven. My sheet pan cakes baked in 15 minutes as compared to the normal 25-30.
Once baked, I cut each cake using a tape measure to 5” x 5” squares. In the end I had 12, 5” chocolate cake squares ready to be stacked with my buttercream.
How to Decorate the Citrus Cake
Once your frosting is made, cakes are baked and citrus is dried, it’s time to start decorating!
Stack your cake squares with a small dollop of buttercream between each layer. Keep in mind that a lot of buttercream will be used on the outside of the cake to get to a rectangular shape as best as possible, so it’s okay to use less frosting between the layers.
Crumb coat the cake as best you can by smoothing a thin layer of buttercream on the sides and top of the cake. This will be slightly difficult because your cake is tall and likely trying to topple over. At this point, it’s a good idea to place dowels in the cake or wrap it in plastic wrap and set it in the fridge until the buttercream sets. This step might seem tedious but it will make the process MUCH easier!
Remove the cake from the refrigerator after an hour or so (can be left overnight too) and remove the plastic wrap if you wrapped your cake. Begin to work your buttercream frosting around the sides and top of the cake, smoothing it as best you can.
I find it’s easier to work when the frosting on the cake is on the more firm end. Therefore I constantly place the cake in the fridge after making a few passes with my bench scraper, leave it for a few minutes, remove it, and make any necessary adjustments.
Be sure to leave some extra buttercream to act as “glue” to stick the citrus fruits onto the cake later on!
Watch my YouTube Tutorial to get extra tips on how to get sharp edges and corners!
My advice is to not drive yourself too crazy getting it 100% perfect. This is meant to be fun and relaxing, and a bit of wabi-sabi is part of what makes it beautiful!
Once the cake is covered in frosting to your liking, it’s time to pop it into the fridge for at least 20 minutes for the frosting to harden again.
While the cake is in the refrigerator, prepare the gold paint by placing 1/8-1/4 tsp of gold luster dust into a small bowl. Then add vodka or lemon juice 1/8 tsp at a time. I put a bit of vodka in the cap of the bottle and add small drops until it’s the consistency I am looking for.
The paint should be between a paste and a paint consistency. If it is too runny it will drip down the cake and make a mess.
Remove the cake from the refrigerator and delicately paint as thin or thick of a border as you’d like. I painted mine about 1/2 centimeter thick.
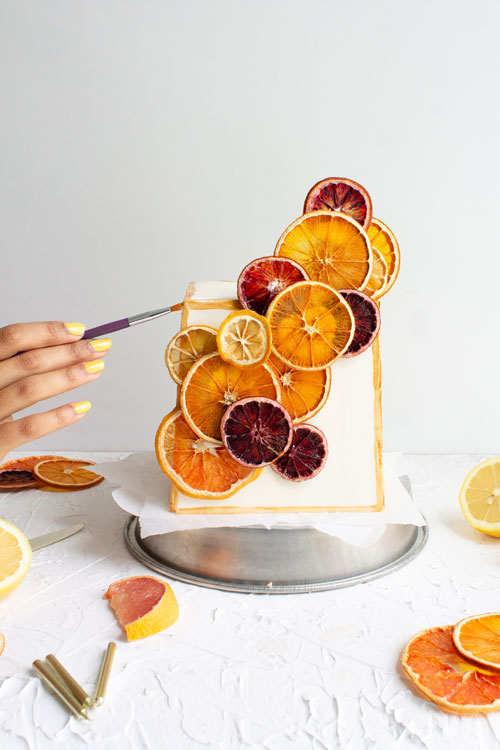
Lastly, grab your dried citrus fruits and place a small amount of buttercream on the back to act as “glue.” Then begin sticking the citrus fruits one by one on the front of the cake until you find a design you’re happy with! I like to add dimension by layering the slices. I even made it look like it defied gravity by “gluing” some slices to other slices with my buttercream.
Whatever you do, just have fun with it and make it beautiful in your own way.
Happy Baking loves
Can baking be therapeutic?
I often talk about baking being a therapeutic hobby but I’d like to share more about why I feel that way as well as how it can become a relaxing hobby for you!
When I bake, it’s my creative time. I may put on my favorite nostalgic movie or tv show in the background, or a Spotify playlist titled “French café” and leave my troubles behind.
Sometimes I pour myself a glass of wine and light a candle. Then, with the mood set, the mixing of batter, kneading of dough and smoothing of icing is my only care in the world.
When I say baking is therapeutic, sometimes people respond saying “not for me it isn’t!” I completely understand why someone might feel that way. There have been plenty of times where I spend hours on something only for it to fail or something breaks that shouldn’t or I forget to clean as I go and am left with a disastrous kitchen to clean.
So I should in reality, have a caveat to my “baking as therapy” claims…
Baking is therapy when you curate the experience to be relaxing.
How do you curate that relaxing experience for yourself, you ask?
How to make baking therapeutic…
- Prepare your mind–know that it’s okay if the cake doesn’t rise, or the butter wasn’t chilled enough. Shift your mindset from seeing your failures as mistakes to seeing them as opportunities for learning.
- Prepare your space–I cannot and will not bake on top of a messy kitchen. If I were to do this I would be starting from a place of stress! Take an extra 10 minutes to clean any dishes in the sink and wipe down the counters, this small effort will pay you back greatly in brain space and clarity.
- Clean as you go! I’ll tell you the one way to make baking stressful and tiresome, is to not clean as you go! After I use each ingredient that I no longer need, I put it away.
After each major step in the process, I wipe down the counters and put dishes that are no longer needed in the sink. If there is chill time or baking time I don’t sit, I do the cleaning then. Make this shift and you’ll really notice the difference!
By the way, this last tip really helped me when I was on The Great American Baking Show–and the crew that cleaned up behind us made a point to tell me that my workspace was always so clean they didn’t have much to do!
I would reply by saying “it’s how I stay sane in this tent!”
Additional suggestions:
*Maybe try printing off the recipe instead of looking at it on your phone, tablet or laptop and use this time to unplug from technology for a few hours
**Invite friends or family over to share your creation with you. Time spent with loved ones over food is a universally special experience
And that’s how I discovered baking for my mental health. If you try any of these suggestions, let me know how it went for you! I’m really invested in spreading this message to others in hopes that baking will enhance your lives more than it already does!

Leave a Reply